How to configure Sendinblue to send emails in Icegram Express?
SendinBlue is an effective and great email software for Small to Medium businesses. When it comes to sending email marketing campaigns and email blasts, SendinBlue offers everything you would expect. using Sendinblue to send emails in the Icegram Express plugin would be a good choice.
In this guide, we will explain to you how to configure Sendinblue to send emails in the Icegram Express plugin.
This feature is available in the MAX version of the plugin
Create Sendinblue Account
You can sign up for Sendinblue here. Setup your new login credentials and click on the create an account button. Also, you can know more about their pricing plans from here. To continue setting up Sendinblue with Icegram Express, you can start with a free Sendinblue trial account.
Verify Your Domain
- Why verify a domain?
Domain verification on Sendinblue enables you to save precious time if you want to create multiple senders on the same domain.
In order to ensure the quality of campaigns sent from Sendinblue, the sender addresses used to send your campaigns need to be created and validated.
To create a sender on Sendinblue, please follow the following steps described in this tutorial.
In short, when you create a sender on Sendinblue you’ll receive an email containing a link that must be clicked. Once the link is clicked, the sender address is validated and you may use that particular email address as a sender address for your campaigns.
Domain verification allows you to skip this manual validation step for your senders. Let’s review an example together: You would like to create three addresses on the @mydomain.com domain:
If the mydomain.com domain isn’t verified on Sendinblue , you’ll receive an email for each address created as a sender. You’ll then have to click and activate each sender manually.
If the mydomain.com domain is verified on Sendinblue, you can then create as many senders as you want on the same domain without having to validate each one individually.
How can I verify a domain? There are three ways to verify a domain.
By uploading a file to your domain’s root directory
By adding a DNS entry to your domain
By sending a verification email to the technical addresses associated with the domain
To verify a domain, you need to go to your Sendinblue account and the following page.
As soon as your domain is verified, the manual validation of sender addresses will no longer be required.
Configuring Sendinblue to Send Emails
Using the REST API allows you to programmatically execute a wide range of code operations which are also available through the user interface. In this guide, you will find a quick start section with the most important concepts about the API, instructions to authenticate and some shortcode examples.
You will need an account on Sendinblue. You can create one from our signup page for free.
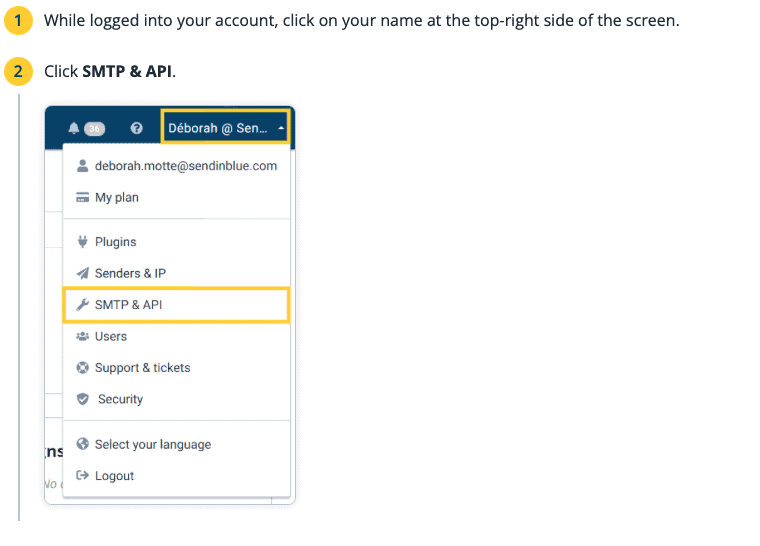
Once you confirmed your account, get your API key from your settings (SMTP & API).

Configuring Icegram Express to Send Emails using API Key
Now that you’ve set up your DNS, you can prepare Icegram Express to start using Sendinblue for sending emails.
- Install and activate the PRO version of the Icegram Express plugin
- Navigate to Icegram Express > Settings page.
- At the top of this page, you can set the From Name and From Email. By default, these will be filled with your site’s name and admin email.
- For the From Email, use an email address associated with your verified domain from Step 3
- Now click on the Email Sending tab and scroll down to the option Select a mailer to send mail and click on SendinBlue as the mailer.Now that you’ve selected Sendinblue as your mailer, a new section will appear below the Mailers list. Here, you’ll need to enter API and Region information.Enter the API Key created from Step 4.
- Once this information is added, click on the Save Settings button at the bottom.
Send a Test Email
Once your domain is verified and your settings have been added to Icegram Express, it’s important to send a test email to ensure that everything is working as expected. You can try sending a test email from the option provided just above the Select a mailer section.